As I am sure you are aware, securing WCF services in .NET 4.0 can be "easy" when you already have access to the service's source code: you can just decorate the service interface/class with the ASP.NET Compatibility attribute and enable compatibility mode in the web.config's serviceModel section. But what happens when you don't have access to that source code? Just enabling that mode in web.config does not work unless the source code is built to allow or require that compatibility mode. Unfortunately for us, the BizTalk Service Factories are not setup with compatibility mode turned on, so that doesn't work. However, we do have a few options:
- Build a custom behavior to use the SSO Database to store groups or users who can access the service (See Victor Fehlberg's excellent post here: http://fehlberg.wordpress.com/2009/10/06/biztalk-r2-authorization-using-wcf/)
- Build a custom behavior to use the ASP.NET URL Authorization Module
Thanks to Victor Fehlberg for providing an excellent solution for SSO: we're going to expand upon that and create a custom behavior that makes use of the ASP.NET URL Authorization Module. What that means for administrators of your BizTalk WCF Services is that they will be able to use familiar tools to secure these services (i.e. the IIS .NET Authorization Rules). To simplify following this post, many of the steps taken in creating the SSO behavior are used in creating the ASP.NET Authorization behavior, and will be reposted here as well instead of referencing individual steps.
ASP.NET URL Authorization
The module used by IIS and ASP.NET to determine who is authorized to access a URL (and optionally a verb for that URL) is in the System.Web library, and easily called using a Windows Principal from the Security namespace. Determining if the authenticated user can access the service is done by:
- Determining the current Windows Identity
- Instantiating a Windows Principal using that identity
- Determining the SVC file URL by using the VirtualPathExtension
- Verifying the access using System.Web.Security.UrlAuthorizationModule's CheckUrlAccessForPrincipal method, passing the SVC URL, the Windows Principal, and the verb (i.e. GET)
Authorization Source Code
//Get the WindowsPrincipal of who is calling.
WindowsPrincipal wp = new WindowsPrincipal(ServiceSecurityContext.Current.WindowsIdentity);

//Use IIS' authorization rules module to check rights of the current user against the virtual directory.
if (!UrlAuthorizationModule.CheckUrlAccessForPrincipal(instanceContext.Host.Extensions.Find<VirtualPathExtension>().VirtualPath, wp, "GET"))
       throw new AddressAccessDeniedException("Access Denied to service " + instanceContext.Host.Description.Name);
WCF Stack Injection
To make this happen at each call to a BizTalk WCF service, we need to create a Message Inspector to wrap the above code, and a Service Behavior to add the inspector to all endpoint dispatchers, and register that behavior in the machine.config so that the BizTalk WCF Custom Isolated Configuration Editor knows about it.
Message Inspector Source Code
The message inspector source code makes use of the authorization source code above, and throws any necessary exceptions and sends any error messages back to the client. This should inherit from IDispatchMessageInspector, which means that the authorization check should occur during the AfterReceiveRequest method, and the denial message should be sent during the BeforeSendReply method.
class ASPNETCustomAuthorizationInspector : IDispatchMessageInspector
    {
        public object AfterReceiveRequest(ref System.ServiceModel.Channels.Message request, System.ServiceModel.IClientChannel channel, System.ServiceModel.InstanceContext instanceContext)
        {

            //If the user is anonymous, don't bother with the rest, just deny!
            try
            {
                if (ServiceSecurityContext.Current.IsAnonymous)
                    throw new Exception();
            }
            catch
            {
                //If there's an exception, it is probably ServiceSecurityContext being null.
                //Deny the user the same.
                return false;
            }

            //Get the WindowsPrincipal of who is calling.
            System.Security.Principal.WindowsPrincipal wp = new System.Security.Principal.WindowsPrincipal(ServiceSecurityContext.Current.WindowsIdentity);

            //Use IIS' authorization rules module to check rights of the current user against the virtual directory.
            if (!System.Web.Security.UrlAuthorizationModule.CheckUrlAccessForPrincipal(instanceContext.Host.Extensions.Find<System.ServiceModel.Activation.VirtualPathExtension>().VirtualPath, wp, "GET"))
                throw new AddressAccessDeniedException("Access Denied to service " + instanceContext.Host.Description.Name);

            return true;
        }

        public void BeforeSendReply(ref System.ServiceModel.Channels.Message reply, object correlationState)
        {
            //This is to catch any fallout from uncaught exceptions in the AfterReceiveRequest
            if (correlationState==null) correlationState=false;

            if (!(bool)correlationState)
            {
                //When correlationState is false, we need to reply with a fault that the user is not authorized
                reply = Message.CreateMessage(MessageVersion.Soap11, MessageFault.CreateFault(FaultCode.CreateSenderFaultCode("Unauthorized", "http://phidiax.com/wcf/authorization"), new FaultReason("User not authorized to access service")), reply.Headers.Action);
            }
        }
    }
Behavior Source Code
The behavior injects the Inspector into the Dispatch Runtime for each endpoint.
    class ASPNETCustomAuthorizationBehavior : System.ServiceModel.Description.IServiceBehavior
    {
        public void AddBindingParameters(System.ServiceModel.Description.ServiceDescription serviceDescription, System.ServiceModel.ServiceHostBase serviceHostBase, System.Collections.ObjectModel.Collection<System.ServiceModel.Description.ServiceEndpoint> endpoints, System.ServiceModel.Channels.BindingParameterCollection bindingParameters)
        {


        }

        public void ApplyDispatchBehavior(System.ServiceModel.Description.ServiceDescription serviceDescription, System.ServiceModel.ServiceHostBase serviceHostBase)
        {
            foreach (ChannelDispatcher cDispatcher in serviceHostBase.ChannelDispatchers)
                foreach (EndpointDispatcher eDispatcher in cDispatcher.Endpoints)
                    eDispatcher.DispatchRuntime.MessageInspectors.Add(new ASPNETCustomAuthorizationInspector());
        }

        public void Validate(System.ServiceModel.Description.ServiceDescription serviceDescription, System.ServiceModel.ServiceHostBase serviceHostBase)
        {

        }
    }
Behavior Element Source Code (for Machine.config)
The Behavior Element provides instantiation and type information of the behavior for use in the machine.config file.
    class ASPNETCustomAuthorizationBehaviorElement : System.ServiceModel.Configuration.BehaviorExtensionElement
    {
        public override Type BehaviorType
        {
            get { return typeof(ASPNETCustomAuthorizationBehavior); }
        }

        protected override object CreateBehavior()
        {
            return new ASPNETCustomAuthorizationBehavior();
        }
    }
Machine.config Updates
To make the behavior known to the BizTalk configuration dialogs, the library containing these classes must be strong named and stored in the GAC, and added to the.NET 4.0 machine.config files in the system.serviceModel/extensions/behaviorExtensions section. (both 32 and 64 bit).
<add name="ASPNETCustomAuthorizationBehavior" type="Phidiax.WCF.SecurityMessageInspectorExtensions.ASPNETCustomAuthorizationBehaviorElement, Phidiax.WCF.SecurityMessageInspectorExtensions, Version=1.0.1.0, Culture=neutral, PublicKeyToken=61337eeaf44284be" />
Publishing the BizTalk WCF Endpoint
Now that the behavior is created and setup in the machine.config, the BizTalk WCF Receive Location can be published and have this behavior used to authorize users to access the service.
Publish WCF Wizard
When publishing the schema or orchestration as a service, two key items must be accounted for:
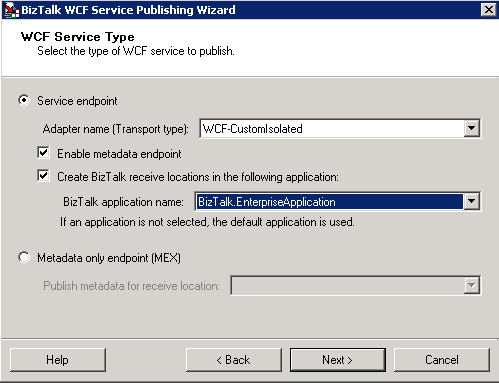
Use WCF-CustomIsolated binding types to allow additional configuration
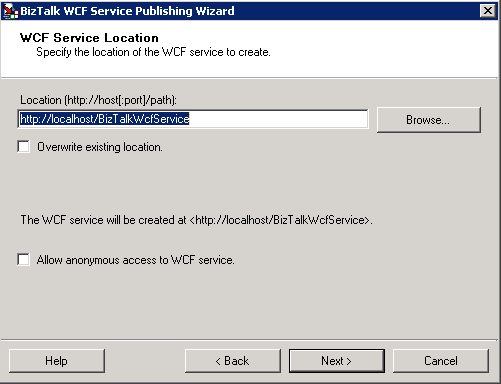
Do not allow anonymous access to the service during the publish process
WCF Receive Location Configuration
Once the wizard completes, the receive location will exist within the indicated application within BizTalk. Before using the receive port, the binding information needs to be configured. Configure the transport of the receive location for basicHttpBinding, and set the security mode to TransportCredentialOnly:
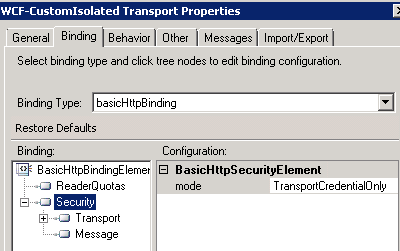
Setting binding to basicHttpBinding and security mode to TransportCredentialOnly
Also set the Security Transport clientCredentialType to Windows:
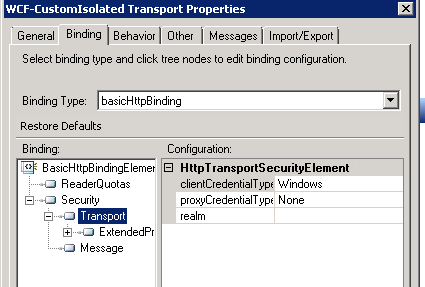
Set the Security Transport clientCredentialType to Windows
On the behavior tab, right-click ServiceBehavior and select Insert. The newly created behavior that was setup in the machine config should be present. Select it and click OK:
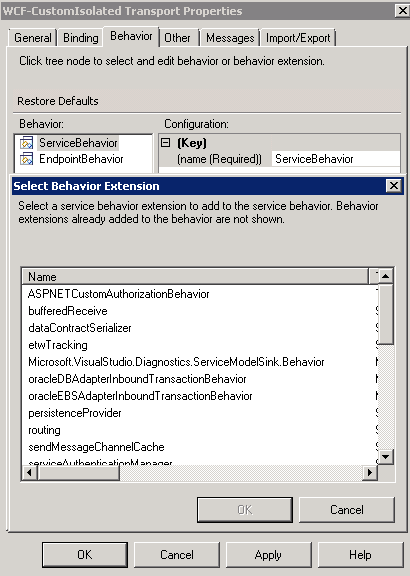
Select the new behavior
IIS and Web.config Setup
The final setup involved is to setup the IIS Application that BizTalk created to Disable Anonymous Authentication and Enable Windows Authentication:
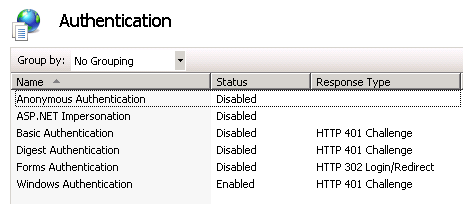
Enable Windows Authentication and Disable Anonymous Authentication
Create any necessary allow or deny rules to authorize the proper users and groups using IIS .NET Authorization Rules setup:

Setup any allow or deny rules using IIS .NET Authorization Rules
Finally, examine the web.config for the BizTalk WCF Service. If the HttpMexEndpoint or HttpsMexEndpoint is enabled, comment that out: MEX endpoints cannot use Windows Authentication, and this will cause obscure errors if left enabled.
Test it out!
To test out the service authentication, open that Service WSDL in your favorite test utility (or even in your favorite browser: the WSDL itself should also be blocked when accessed by unauthorized users), enter your authentication details, and run a request as an unauthorized user. You should not have access, and the underlying method in the service should not have run. Run a request or access the WSDL as an authorized user, and you should get the expected results and be good to go!


