Introduction
In this blog, I will be describing and
illustrating the difference I’ve recently come across when creating Service Bus
Relay and associated namespaces.
I want to demonstrate:
- How to create a namespace
in Azure Service Bus
- What are the
characteristics and its default security policy
- What are the expected
errors you would encounter with SAS based security policies
- How to overcome the
default SAS security policy
In this blog, the discussion will focus more
on the ACS security policy for secure message exchanges. I set out to
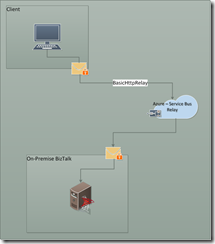
demonstrate is to send a secured one-way message from any client application
over to an on-premise BizTalk application through Azure’s Service Bus Relay
service as illustrated below.
Problem
I’ve been recently tasked, once again, to provide a POC that will allow a client application to send messages to an on-premise BizTalk application. During configuration of the Service Bus namespace and subsequent client and BizTalk applications, testing revealed a communication problem that read as follows:
The token provider was unable to provide a security token while accessing ‘http://dev-acme-orders.accesscontrol.windows.net/WRAPc0.9/’. ‘Name could not be resolved’.
Approach
Like so many POC’s I’ve done in the past on this same message exchange pattern, I thought, sure, this is easy, I’ve done this type of demo before countless times. Shouldn’t be a problem. What could go wrong? What I’ve come to discover with Microsoft Azure is that implementing message exchange between client applications through the cloud to an on-premise BizTalk applications, changes like the seasons. One example is the use of the security policy for message exchanges. When Azure Service Bus was at its infancy, it used the ACS (Access Control Service). Without getting into the nuances, it’s basically a cloud-based service for authentication and authorization on order to gain access to applications without having to define security in the code itself.
Azure’s Service Bus Relay allows administrators to define a namespace that uses ACS as the default security policy, at least that was defined as “default” until August of 2014. That’s when Microsoft decided that SAS will be the recommended and de facto default security policy on Azure. There are countless examples out there on the Internet explaining and demonstrating how to create a Service Bus namespace and how to relay messages from a client to the on-premise BizTalk application, and as Microsoft continues to improve Azure, these examples become unworkable due to some security change. It really keeps us developers on our toes to adopt the ever changing pattern.
As I researched these message exchange patterns, one thing I struggled with was making these examples work and after it was all said and done, it took me a couple of frustrating days to figure out that most of the examples out there did not work. One of the recent challenges I was faced with was the ACS vs the SAS security policy and this blog will hopefully save someone some time in figuring out a specific error I encountered during my POC work.
As I proceeded to put together this POC, I went about creating the necessary namespaces for the Service Bus in the Azure portal as illustrated below. Step 1, create a namespace in the Service Bus Relay in Azure.
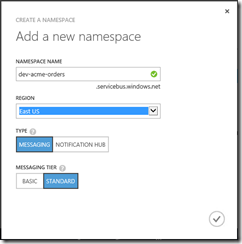
By default, the portal creates an SAS security policy, as evident here:
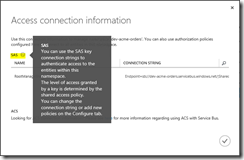
The end result is a set of shared access keys that I would use in my client and BizTalk applications for secure message exchange.
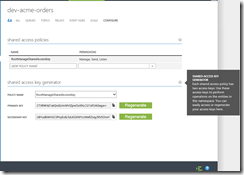
The next steps were to create a BizTalk application that would use these keys to receive messages from the client. The requirements called for the use of either the Wcf-BasicHttpRelay or Wcf-NetTcpRelay bindings, so I proceeded to create the BizTalk application with the following receive location settings:
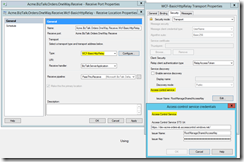
Note that I’m using ACS as the credentials policy on my BizTalk ports as this was my only choice for these bindings, no option for SAS. More to come on this.
I also created a send port with a filter to subscribe to the receive port messages to examine the output. Fairly simple thus far. Once I get my ports all setup, I went ahead and started all of the necessary ports.
Next step is to create a client application to test my message relaying. The requirements call for the client application to submit a message to the cloud relay point where it should route down to the awaiting on-premise BizTalk application I just created. The client code snip-it to send the message to the Service Bus Relay up in the cloud looks something like this:
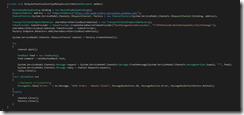
Note the credential information. Looks exactly like those over on BizTalk ACS credentials. At this point, I’m all set and I’m ready to submit a message from the client and expect a message over on the on-premise BizTalk application. This should work, right? WRONG! I was faced with the following error message when submitting the XML message at the client level. Never even made it over to BizTalk.
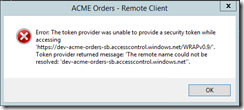
The token provider was unable to provide a security token while accessing ‘http://dev-acme-orders.accesscontrol.windows.net/WRAPc0.9/’. ‘Name could not be resolved’.
I pondered over this for a while and couldn’t put my finger on it. Then it hit me, and I’ve highlighted it in one of the steps above. It stated that it was using SAS yet the error message pointed to an AccessControl problem, a.k.a ACS. I had inadvertently created an ACS credentials policy in Azure while BizTalk was expecting an ACS policy. This now begs the question, how do I create an ACS policy to satisfy my receive port bindings? I can either change bindings to use SB-Messaging, or re-create the dev-acme-orders namespace using an ACS policy. So I took it upon myself to do it the hard way, create a new namespace with ACS security policy in Azure.
Solution:
Having learned the hard way that the Azure Portal defaults its security policy to use SAS instead of ACS, the quest was on to find an alternative way to perform the action of creating a namespace but with ACS security policy instead. Turns out, there’s nothing on the Portal itself that I can use to perform this action. My quest had led me to having to do this manually using PowerShell commands.
Azure PowerShell is a powerful scripting environment that you can use to control and automate the deployment and management of your workloads in Azure. Knowing that, I will need to find a way to perform the same actions I did on the Portal using PowerShell cmdlets in order to create namespace using ACS security policy.
The solution calls for the following steps:
- Download and install the Azure PowerShell SDK if you haven’t already done so. If not, use the following link: http://azure.microsoft.com/en-us/documentation/articles/powershell-install-configure/ Once the set of cmdlets are installed, you’re ready to rock ‘n roll with performing the necessary commands for creating a new service bus namespace with ACS.
- Ensure that you are logged in using your Azure account for perming the necessary commands. Start the Microsoft Azure PowerShell console and enter the following command: PS C:\> Add-AzureAccount
- Provide Live ID user name/password to connect to a default Azure subscription
- Create a new Azure Service Bus namespace using the command: PS C:\> New-AzureSBNamespace –Name dev-acme-orders2 -Location "Central US" -CreateACSNamespace $true -NamespaceType Messaging
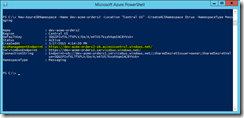
- Observe the differences in the namespace types and note the new values added to the ACS security policy as compared to the default SAS policy created at the Portal level. PS C:\> Get-AzureSBNamespaces

- Observing the new namespace now reveals that there’s actually a value in the AcsManagementEndpoint in the form of an AccessControl URI.
- Change binding information at both client and BizTalk levels to reflect the newly created namespace along with the AccessControl URI and retest.
Conclusion
In conclusion we’ve observed how Azure Portal creates SAS based namespaces and through the use of Azure PowerShell create a similar namespace with ACS security policy. We’ve also learned how to relate the error message to the missing AccessControl URI and how to query the namespace with PowerShell cmdlets. Hopefully this will save someone hours of frustration when dealing with this latest Microsoft gotcha.
Next...
In the second part of this series on Azure SAS/ACS security policies, I’ll demonstrate how to create an SAS message exchange pattern using SAS security policy using the exact same client/BizTalk sample. I will also show the difference between, ACS and SAS security.
Enjoy
~Nic


